
What you need to know about Git, and Git commands that you will use on daily basis
As most people know, git is a really big part of programming and is used everywhere and in every project. So learning the commands and how to use them is important and useful. Every project you work on will use some kind of git: "Github", "GitLab", "BitBucket" or any of the other one. In this post, we will go through what git is, and what are some of the commands you will probably use daily.
NOTE If you use some kind of GUI for git like "SourceTree", "Github Desktop" or maybe VSCode extension. Try using more of the console for git since that will help you understand what happens behind those button clicks, and will be useful in case you get stuck somewhere and need to figure out what happened
What Git is?
Git is a type of version control system that makes it easier to track changes to the files. For example, if you edit some file, git can help you determine what exactly changed, who changed the file, and why they changed it. If git is enabled in the project you are working on, it tracks the changes on the files you are working on and changing, so later you can go and check what changes were made, on what files, and also who made those changes.
This can help you a lot in your project, if you made a mistake somewhere in code you can go back in time and check every change and check what and where the issue happened. Just imagine the world 🌍 without git, and you made mistake in a project that has many files and few people working on it, and a bug is found.
It would be quite hard to find the cause of the bug, when it was made, and also what else is affected by it. That's why tools like git make our life much easier and less stressed 😄.
When we initilize git in our project we get local working directory, which means all the changes to the files and commiting happens on our local machine, and we are the only ones that can access these files. So in case something happens with your local computer, and you can't restore that computer you'll also loose all those changes and everything your did on the project. Thats why tools like Github or GitLab or any other tool like this helps us save our work no matter what happens to our computer. What they actuall do is create copy of our local git project and put them on the internet where we can access anytime we need it. Also we have options to make our projects private and choose who can access them and work on them, in case we have multiple people working on project, or if you working on something yourself that is a secret 🔏 and dont wan't other to see it. That is called remote working directory and we have neat commands that make it quite easy to send our locally changed files to remote location.
Commands in Git 💻
git add && git commit
One of the most used commands on a daily basis is git add and git commit, we use this to add changed files to staged changes, which means if we have mutiple files changed in project, but only want to add few files to local repository we use git add and add them for staged changes and prepare for next step which is commiting.
1git add file.js
Using this command we add one or multiple files to staged changes and then we can go to the next step which is committing those files to a local repository. We also have a command to automatically add all changed files in the project to the staged changes by using.
1git add .
Using this we can commit all the changed files and don't have to name them one by one. After we add files we can commit them by using this command:
1git commit -m "Commit message"
Then we commit our files to a repository with an appropriate message and can continue working on our project without fear we will lose something or remove something. If we want to add all the files to staged changes and commit them without checking anything, we can use a shortcut that enables us to do that:
1git commit -am "Commit message"
NOTE: Better option would be to add changed files to staged changes and verify that nothing is missing or maybe unwanted stuff is added. And after files are verified, commit them to the repository.
git status && git log
The next thing that is used a lot is git status and git log, these two are used to check the status of the files. git status shows us which files are changed and which ones are added to staged changes, and git log shows us our commit history. They are quite useful because they give you the possibility to check what changed, is it staged or not. Or to check the history of commits, overview what happened with that branch.
1git status
Try this in your git console and see what happens, if you have modified any of the files they will show in the console, and maybe you can play around with git add and see what changes.
1git log
When you execute this command git log you will see a list of all the commits on the current branch, all the commits have commit id and commit author, also there should be date and commit message that you've added. Also if you don't need all that information about commit, you can use a shorter version of git log which can give you a better overview, and more commits on the screen.
1git log --oneline
There are many variations for git log and other git commands, and the best place to check them all is the official documentation for Git and ProGit book that is free, and goes much deeper than this post. Definitely check it, and see what other options are there, maybe they are useful for your use case.
git branch && git checkout
These commands are also used often, not as much as the ones above. We used them when we want to add a new feature or test something on our application, but don't want to do that on the main code, so we don't break stuff, we do it on a different branch, that has the same files but on a separate place. This way we can do whatever we want without fear of breaking stuff that works. This is also the reason that we have main branch that contains only stuff that is verified and works, and we create separate branches to add new things and/or test things. So we use git branch branch-name to create a new branch with the name we gave it to it, and if we want to check if it's created, we can use git branch and we will get the list of all branches we have on our local repository.
1git branch test-branch
1git branch
When we verify that branch is created, we use git checkout branch-name to enter that branch, and when we do that all the changes that are made will only be there, and no other branch will be affected.
1git checkout test-branch
As with many git commands, we can use a shorter version of git branch branch-name and git checkout branch-name that can help users create a new branch, and automatically go to that branch, that command is:
1git checkout -b test-branch
This will create a new branch named test-branch and will do a checkout, so you don't have to manually do checkout. These short commands can save some time, and if you are in a hurry, sometimes you forget to checkout branch after creating, and you start creating changes on the wrong branch (happened to me 😌).
git merge && git stash
These two are not used that often, but very useful. For example, if we have some changed files in our repository, and maybe we have an error in some other branch, but we are in the middle of work, you can't just checkout another branch because we might have some conflicts. We can use git stash to help us, what it does is save the changes that we made on the current branch to the some place on the side so we can access it later when we need it. So we stash the changes, go to the other branch and fix those issues, then come back to the branch where we stashed changes and apply those changes and continue where we left off. To stash changes we use:
1git stash
With this command, we created a stash file that we can apply later when we need it, or if we decide we don't need it we can just delete it. If we use this command, it will create a list of stashed changes listed by index. When we want to check list of our stashed files, we can use this command to see them:
1git stash list
And if you want to apply changes you stashed, you have to use the index of changes you want,you can use git stash list to see all the stashed files, and if you want a third stash we can apply those changes like this:
1git stash apply stash@{3}
Now we will get all the changes in our project that were in that stash, this is helpful when you need to jump between branches. The next command is git merge, and we use this to combine branches. We usually combine our working branches with the main branch, after we finish them and test they work. The way we use it is that we go on a branch that we need changes on, and type command and merge the branch that we need, sounds confusing but it's actually quite easy 😎
1git merge test-branch
So if we are on the master branch and we execute this command, we will merge all the changes from the test-branch branch to the master, and we will have everything on the master branch.
git push && git pull
All the commands we talked about above are used on the local repository, which means we are the only ones that can see the project, work on it or do anything to it. But now we decided to put our project on the Internet, so our colleagues or friends can work on the project with us, or maybe we want to make a backup in case something happens to our machine and we lose the local repository. When we make changes and commits on our local repository and are ready to add that to the remote repository, we can use git push to add those changes to the remote repository. We just execute it and git does its magic and puts everything on the remote repository, simple as that.
1git push
Now we made a backup of our changes and don't have to live in fear that we could lose stuff if the machine goes crazy one day
We use git pull to get the latest changes from our remote repository, so if someone works with us and added some new stuff that we need to use, we can execute this command and get all the changes to the local repository.
1git push
Now we have all the changes in our local repository, and now we can keep working and use those files from the remote repository.
NOTE: These are commands that are used quite often, it's good to know what they are, how they work, and how to use them, but don't stay on just these, visit the official documentation and ProGit book and add more knowledge to your skills
Some of the commands that are worth mentioning are git reset that we use to reset commits, so if we made some mistakes in commit maybe wrong files added or wrong title or whatever, we use git reset to un-commit changes and fix them, then commit them again but with right values. git rebase is also a quite powerful command that has many abilities, definitely read more about it in official documentation git
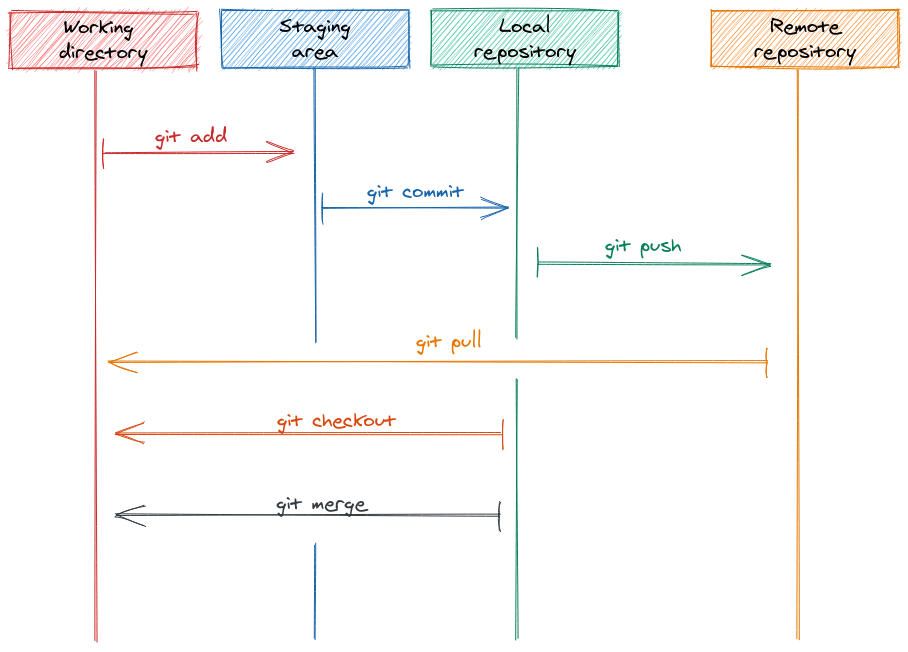
Drawing by Fatima Trtak
Local repository
- git add (Add changed files to staged changes, and prepare them for committing)
- git commit (Add those changed files to the local repository)
- git status (Check which files are changed and which ones are in staged changes)
- git log (See the list of the commits on the branch)
- git stash (Stash changes when you need to switch branches and apply them later)
- git merge (Combine branches so you have files from other branches)
- git branch (Create branch and separate tasks in progress)
- git checkout (Go to the created branch)
Remote repository
- git pull (Pull changes from a remote repository)
- git push (Push your local changes to the remote, and create a backup for them)
Conclusion
We got through this long post, with a lot of useful knowledge gained. Now we have more confidence while working with git. We covered adding files and committing them to a local repository, we also saw how to check what changed and what was committed. Also, we learned how to create branches that we use to separate work, and we learned how to add projects and all changes to a remote repository. That means that we can share our project with others, that many people can work on the same project easily, and we have a backup of our project in case we have problems with our machine.