

There are many answers about this topic floating around the internet, but many of them make it complicated for some reason when explaining. This shouldn't be that hard to understand so I'll try to fill the gaps for this topic. I've also noticed that images can help when trying to understand stuff, so I'll try to use simple examples to explain debounce and throttle in javascript.
What is debounce? ⚽
It is a programming practice that we use to ensure that certain tasks don't fire too often. What I mean by that is that we forbid firing certain actions one right after another. And how that works is that you set a delay on those actions that need to be executed, and every time you fire that action new delay is created, and the previous action is removed so we don't fire it multiple times.
Here is the image that explains debouncing:
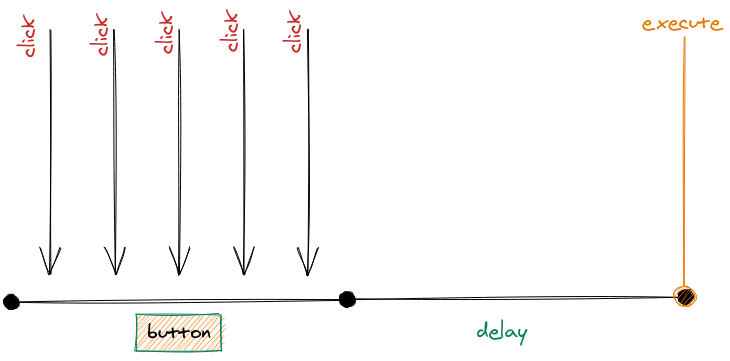
Drawing by Fatima Trtak
As you can see, if we click on the button many times, we will not execute the action that the button is firing until we stop clicking on it, and the delay we set has passed. When delay passes, we execute the action. Here is how we can write that in Javascript:
1const debounce = (fn, delay) => {2 let timeoutID;34 return function (...args) {5 if (timeoutID) {6 clearTimeout(timeoutID);7 }89 timeoutID = setTimeout(() => {10 fn(...args);11 }, delay);12 };13};1415document.getElementById('btn').addEventListener(16 'click',17 debounce((e) => {18 console.count('click');19 }, 1000)20);
1<button id="btn">SUBMIT</button>
Here we have event listener on the button with id "btn". Every time we click on that button, we will fire an action that will write in the console the word "click". When we click on the button, we call a function to debounce and pass two parameters. The first one is a function that we will execute, and the second one is the delay that we will wait after the last time a button is pressed. In the debounce function every time it's called we will create a variable timeoutID that will hold the value to the setTimeout.
We need that reference because every time we click that button new setTimeout will be created, and we need it to delete the previous setTimeout so not all of them get executed but only the last one. Next, we return the function that is executed on every click. Inside we first check if we already have a setTimeout created, if we do we will first delete that one, then we will add to timeoutID new setTimeout that will wait for the delay to pass or if we click again will be deleted and a new one created.
After the delay has passed, we will execute the function that we passed to debounce, in our case it's console.count('click'). Here is a component below that you can play with and check what happens with and without debouncing enabled, click on both buttons and see the counter value changing:
Normal
{
  "requests": 0
}
Debounce
{
  "requests": 0
}
As you can see, we have much fewer clicks on the debounced button than on the normal one. This can be useful in an application where you maybe have a submit button for paying websites, and the user by mistake clicks twice in a row, and it is not handled properly, it can send two requests and maybe take the double value of what was displayed. Debounce is especially useful when it comes to search, if you have implemented a reactive search bar where it should respond with data while you are typing, this can help you send only one request when the user has finished typing instead of every keypress.
What is throttle ? 🏍
Unlike debounce, the throttle is firing event between intervals, so when we click on a button for the first time it will execute the action, and if we keep clicking on that button, it will not fire event until time interval has passed, and if you keep clicking it will fire every time interval it completes. Here is an image representing that behavior:
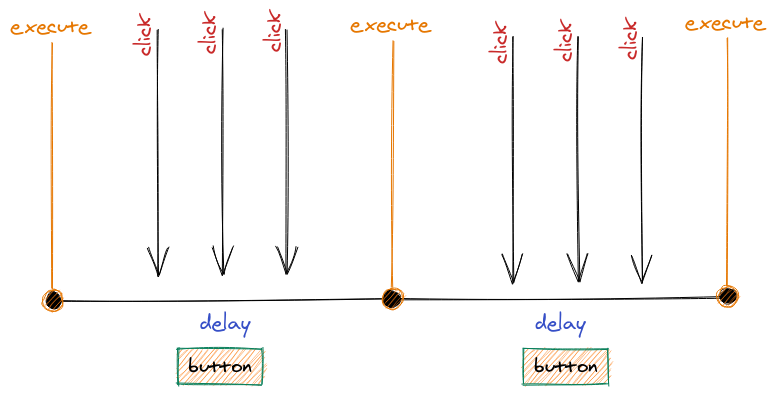
Drawing by Fatima Trtak
You can see on this image (hopefully 😊) that we click on a button and it fires an event, then we keep clicking on it and nothing happens until the delay time has passed and it fires again, and if we are still stubborn and keep clicking the button, it will keep firing event every time the delay is finished. Here is an example of how we can do it in Javascript:
1const throttle = (fn, delay) => {2 let last = 0;3 return (...args) => {4 const now = new Date();5 if (now - last < delay) {6 return;7 }8 last = now;9 return fn(...args);10 };11};1213document.getElementById('btn').addEventListener(14 'click',15 throttle((e) => {16 console.count('click');17 }, 2000)18);
1<button id="btn">SUBMIT</button>
As with debouncing example, we have a button in Html with id "btn", and a throttle function that will be called on every click. Then we create a variable where we will hold the value of the last executed action. In the next step, we send the function back that will be executed every time we click the button, and inside we check if time passed from the first and last click is less than our delay. If the time is less than delay then we do nothing, but if it is not, we assign a new time to the last variable so we can compare it with the next clicks then our callback function (console.count('click')) is returned and executed, and if we keep clicking that button we will always wait for that delay, and after it's passed we execute again. The same goes for the search, if we keep typing some text it will execute every time delay is passed from the first execution. Here is an example of throttle and normal button and search bar, try it and see what is going on:
Normal
{
  "requests": 0
}
Throttle
{
  "requests": 0
}
Hope you tried these examples above, and saw the behavior of the throttling, and could understand how it's different from the debouncing. Throttling is not used in practice as much as debouncing but is good to know and but who knows, maybe it's a better option for what you need on your project.
Conclusion
It wasn't that hard, wasn't it? It's a bit confusing but with some drawings and interactive examples, it gets easier to understand. Debouncing is used a lot and now it can be used even more 😉. To recap, we went through what are debouncing and throttling in Javascript, where it can be used, and how it works. If you are React developer you'll be glad to hear that I'll also plan to create a post about debouncing and throttling in React using hooks, which is a bit different compared to plain Javascript. Also if you can it would be nice to share the post, so others can benefit from this.